Deployments
Deployments are instantiations of any platform asset (AI modules, tools and LLMs) from the Catalog. They are deployed in the platform infrastructure, under the personal user workspace.
In this document, we will focus on how AI modules deployments work, but the same applies for other types of assets. The different workflows are described in the HowTo guides.
Making a deployment
Once you choose an AI module from the catalog, you will be presented with the module’s information page:
To deploy click in Deploy > Inference API (dedicated) and you will be redirected to a configuration page.

This page will allow you to configure mainly three aspects:
General configuration, including the service to run and Docker tags.
The computing resources of the new deployment. A user can select multiple CPUs and GPUs, the machine RAM as well as optionally choosing the physical site where the machine must be deployed.
The remote storage options, like tokens for authentication with Nextcloud.
Use the Show help toggle to view additional info about the fields to fill.
Once you are happy with the state of your configuration, click Submit and you will
be redirected to the page listing all the current deployments.
General configuration
The parameters to configure are:
Deployment title: short name/sentence to quickly identify your deployment.Deployment description: longer description of your deployment.Servicedetermines which service to launch:For performing simple inference,
DEEPaaS(API) is the recommended option, as no code changes are required.For retraining a module,
JupyterLabis the recommended option, as it offers access to Terminal windows which are needed to mount remote data into your machine.For developing a new module,
JupyterLabis the recommended option, as it offers the possibility to directly interact with the machine to write code. Some modules might offer alsoVScode.
If you select either
JupyterLaborVScodeyou must set a password at least 9 characters long.ㅤ 💡 What if I want both
DEEPaaSandVSCode?We do not provide the option to run both JupyterLab and DEEPaaS at the same time, as code changes performed subsequently via JupyterLab wouldn’t be reflected in DEEPaaS (which is launched with the initial codebase), thus potentially leading to confusion.
If you want to have access to both services in the same deployment, launch with JupyterLab. In JupyterLab, open a Terminal window ( (New launcher) ➜ Others ➜ Terminal). Then run
deep-start --deepaasto launch DEEPaaS. If you make subsequent code changes, you will have to kill the old DEEPaaS process and launch a new one.Docker tagselects the appropriate Docker tags of your module (tags may vary across modules). You should choose Docker tag that match with the hardware you selected in the previous step. So if you selected a CPU, look forlatestorcputags. If you selected a GPU, look forgputag.
Hardware configuration
Choose the hardware type to run on:
For inference and code development, we recommend using
CPUas they are low intensity tasks.For (re)training, we recommend using
GPUas this is a more demanding task. For the time being we limit to 1 GPU per deployment (and 2 GPUs per user) to allow for a fair distribution of resources.
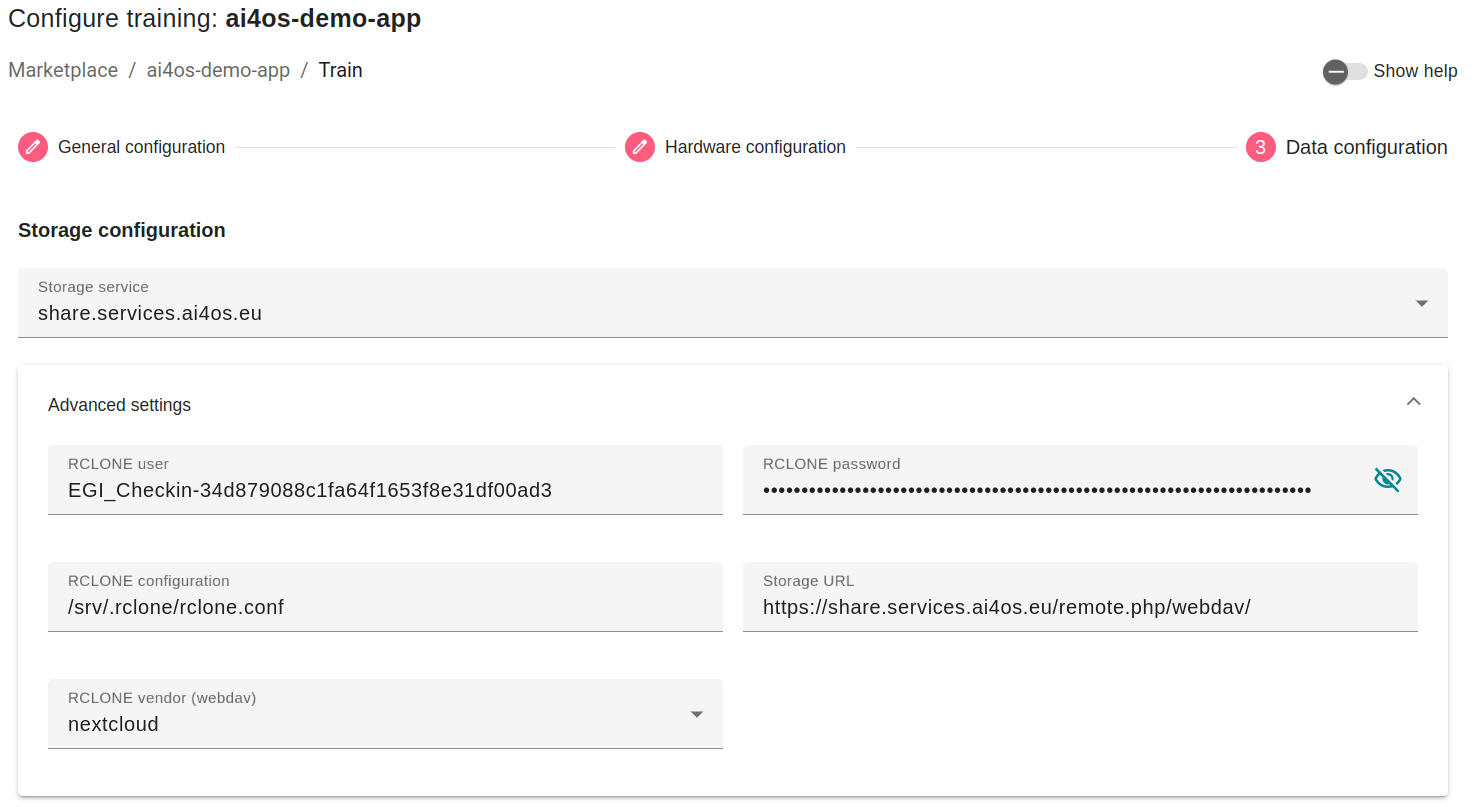
Storage configuration
This is where you can configure how to connect your storage to your deployment. You have two sections:
Storage configuration
This is what will allow you to access your storage from inside your deployment.
You will be able to select any storage from the ones you have configured in your Profile section.
For advanced users, it is also possible to fill your RCLONE credentials manually. Please go here in order to find how to create them.
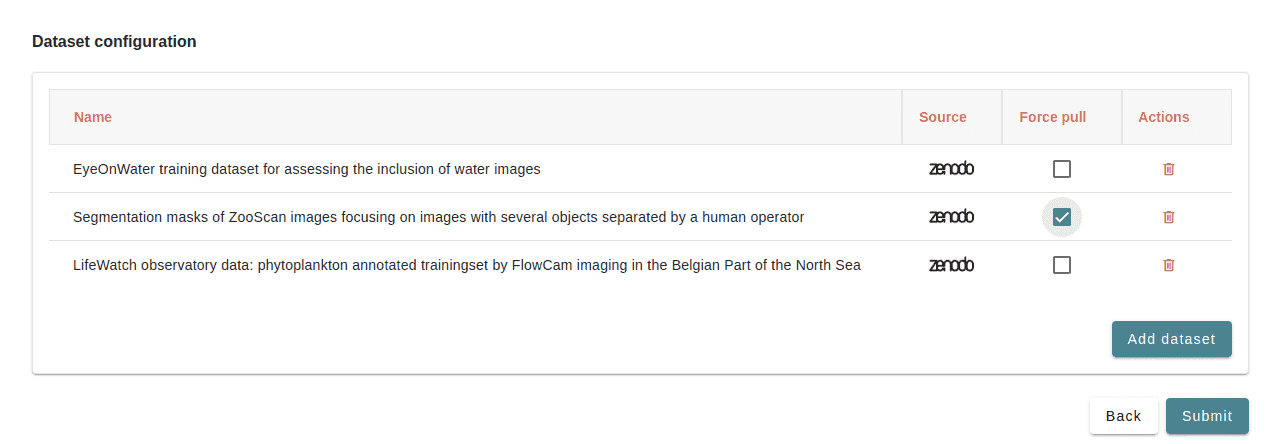
Download external datasets
This section provides the option to sync with datasets from multiple external repositories, including Zenodo, Hugginsface, Figshare, Github, Seanoe, Data Europa, Dryad, Open Science Framework (OSF), Mendeley Data and many more!
For Zenodo, we provide an embedded search functionality to find the datasets attached to any community.
For all repositories, we provide the ability to directly provide a DOI or a URL.
With any dataset, you can select a
force_pulloption, so that if your dataset already exists in your storage it will overwrite the existing files.If the module you are deploying has an reference dataset listed by the module’s creator, this will appear as a suggested dataset.
ㅤDownload a dataset from Zenodo
Please, be aware that video demos can become quickly outdated. In case of doubt, always refer to the written documentation.
Managing the deployments
In the Deployments tab (in the Navigation panel on the left) you have a table view of all the deployments you have made so far, separated both in Modules and Tools tables:
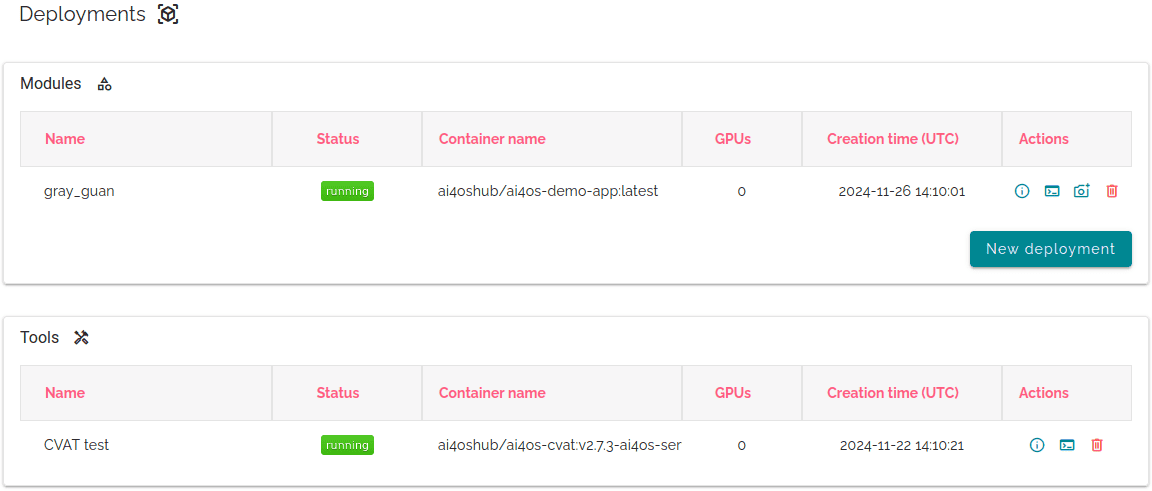
Under Info you will find details about your deployment such as UUID, resources assigned/requested, error messages, endpoints of all services, etc.
For the endpoints of the services you have:
API: Module’s API, only accessible if you launched with the DEEPaaS command or launched JupyterLab then ran DEEPaaS.IDE: Development environment, only accessible if you launched with the JupyterLab or VScode command.Monitor: Training monitoring, only accessible if the module has been coded to explicitly display monitoring (check the module’s README or training arguments) and if a training is currently running.UI: Gradio User Interface, only accessible if you launched with the DEEPaaS command.Custom: a custom UI created by the module’s developer (if any)
Under Quick access you will be able to access the service you deployed at launch time.
If you had a deployment that took more than a week to deploy you will receive an email notification when it is finally deployed.
Deployment deletion
Sometimes deployments can get stuck in the deletion process, thus not completely freeing the resources you are consuming (eg. GPUs). If this is the case, please try re-deleting them again. This time it should execute a hard delete, completely purging your deployment.
Creating a snapshot of a deployment
In the Modules table, you will see a Create snapshot option.
This will allow to create a snapshot of any module you have deployed. This come especially handy for example when a downtime of the cluster is expected and you do not want to lose your work, or when you don’t plan to keep working on something for a period of time but you don’t want to keep consuming the resources.
Once you click in the button, the snapshot will appear below, in the Snapshots table.
You can redeploy snapshots at any time by clicking in the Redeploy snapshot button, where you will be asked whether to redeploy in standard mode or batch mode.
