Train in standard mode
Requirements
🔒 You need a platform account with full access level to be able to access both the Dashboard and Nextcloud storage.
For Step 8 we recommend having docker installed (though it’s not strictly mandatory).
This is a step by step guide on how to train a model with your own dataset in standard mode. In standard mode, you will get a persistent deployment that you will be able to interact with via an IDE.
1. Upload your dataset to Nextcloud
For this example we are going to use the AI4EOSC Nextcloud for storing the dataset you want to retrain the model with. So login to Nextcloud with your credentials and you should access to an overview of your files.
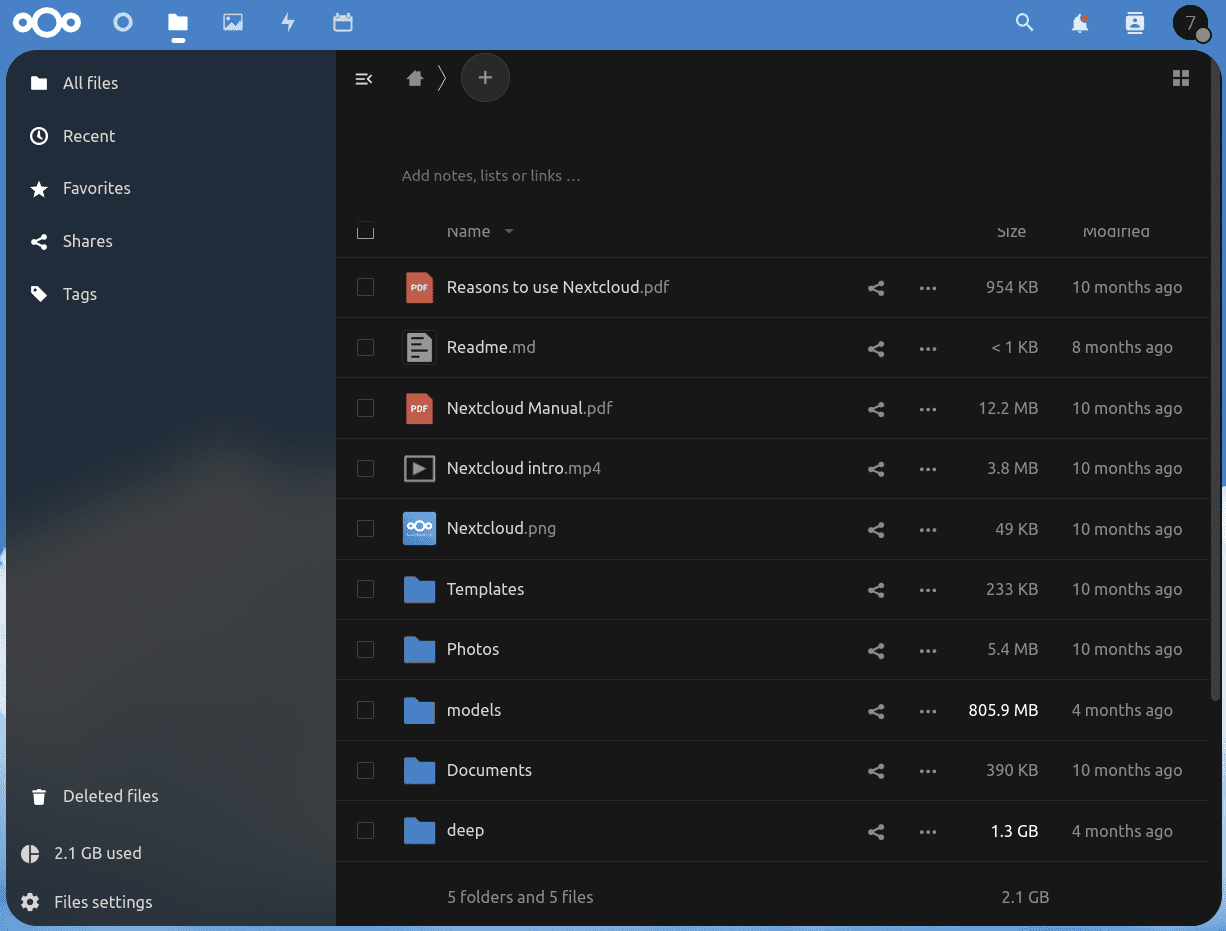
Now it’s time to upload your dataset. When training a model, the data has usually to be in a specific format and folder structure. It’s usually helpful to read the README in the source code of the module (in this case located here) to learn the correct way to setting it up.
In the case of the image classification module, we will create the following folders:
A folder called
modelswhere the new training weights will be stored after the training is completedA folder called
datathat contains two different folders:The sub folder
imagescontaining the input images needed for the trainingThe sub folder
dataset_filescontaining a couple of files:train.txtindicating the relative path to the training imagesclasses.txtindicating which are the categories for the training
Again, the folder structure and their content will of course depend on the module to be used.
Once you have prepared your data locally, you can drag your folder to the Nextcloud Web UI to upload it.
Uploading tips
If you need to upload your dataset from a remote machine (ie. no GUI), you can install rclone on your remote machine, configure it and do an rclone copy to move your data to Nextcloud.
Uploading to Nextcloud can be particularly slow if your dataset is composed of lots of small files. Considering zipping your folder before uploading.
$ zip -r <foldername>.zip <foldername>
$ unzip <foldername>.zip
2. Prepare your training environment
In this tutorial we will see how to retrain a generic image classifier on a custom dataset to create a phytoplankton classifier. If you want to follow along, you can download the toy phytoplankton dataset here.
The first step is to choose a model from the Dashboard. Make sure to select a module with the AI4 trainable tag.
For educational purposes we are going to retrain a generic image classifier.
Some of the model dependent details can change if using another model, but this tutorial will provide a general overview of the workflow to follow when using any of the modules in the Dashboard.
Check how to configure the image classifier. During the configuration, you should make sure:
to select either
JupyterLaborVScodeas the service to run, because we want the flexibility of being able to interact with the code and the terminal, not just the API.to select
GPUas hardware, because training is a very resource consuming task. This will also imply that you might need to select a Docker tag that is compatible with GPUs.to connect with one of your synced storage providers (in our case, the project’s Nextcloud instance)
3. Access your deployment
After submitting you will be redirected to the deployment’s list.
In your new deployment, select ⓘ Info and click in the IDE endpoint, when it becomes active.
After logging in you should be able to to see your IDE:
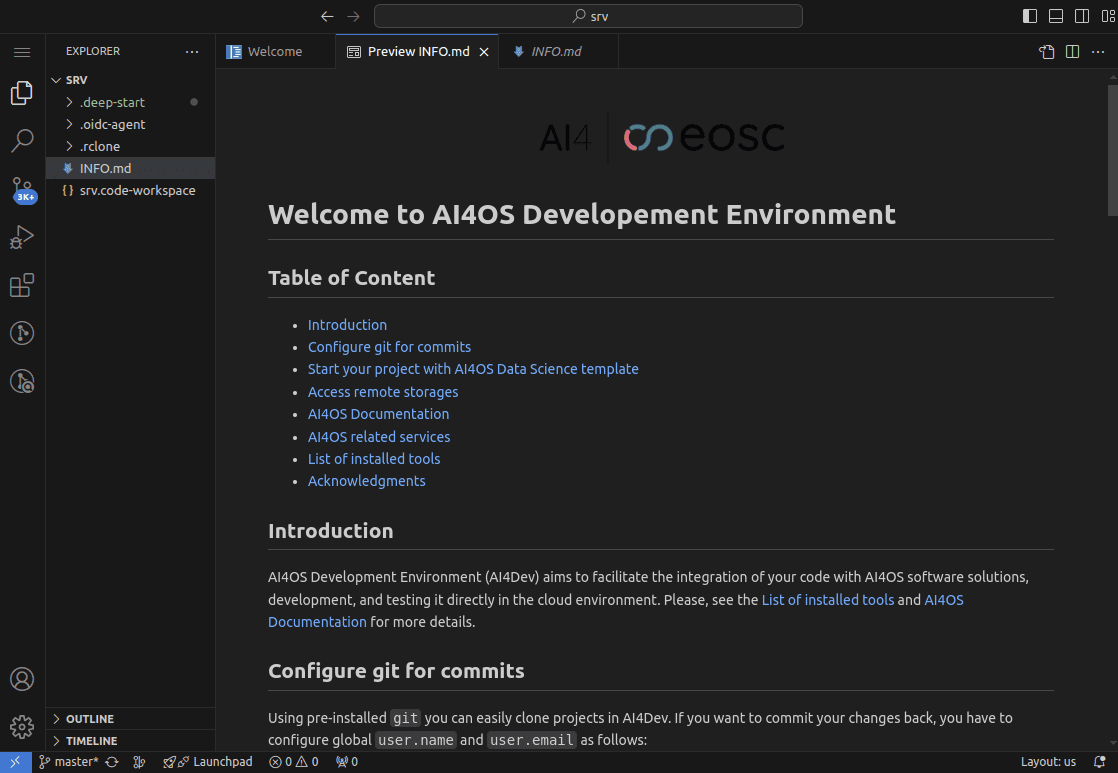
Now, open a Terminal to perform some sanity checks:
Check the GPU is correctly mounted:
$ nvidia-smiThis should output the GPU model along with some extra info.
Your storage is correctly mounted:
$ ls /storage
This should output your Nextcloud folder structure.
Accessing storage
Your files under
/storageare mounted via a virtual filesystem. This has pros and cons. We also offer the possibility to copy the files to the local machine as long as they fit the available disk.
4. Start training the model
We will use the DEEPaaS API to interactively run the training. In your Terminal type:
$ nohup deep-start --deepaas &
The & will keep your command running even if you close the terminal, and nohup will produce a log file nohup.out that you can always look at if you want to know what is going on under the hood.
Now go back to the Dashboard, in the Deployments list view.
In your deployment go to ⓘ Info and click on the API active endpoint.
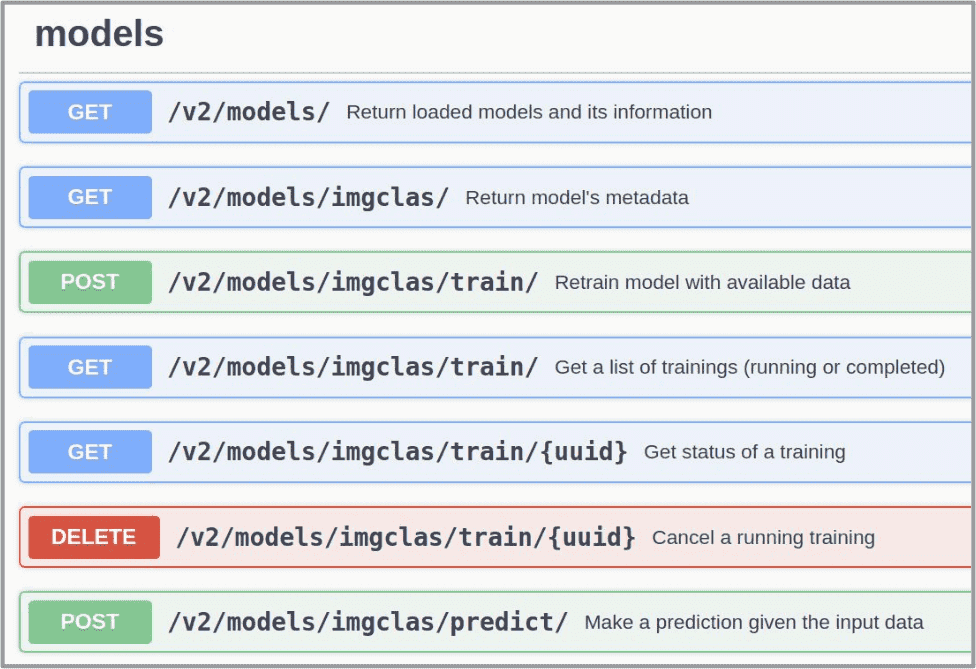
Look for the train POST method. Modify the training parameters you wish to change and execute. In our case, you might need to correctly point to the training dataset location.
If some kind of monitorization tool is available for the module, you will be able to follow the training progress at Monitor active endpoint. In the case of the image classification module, you can monitor training progress with Tensorboard.
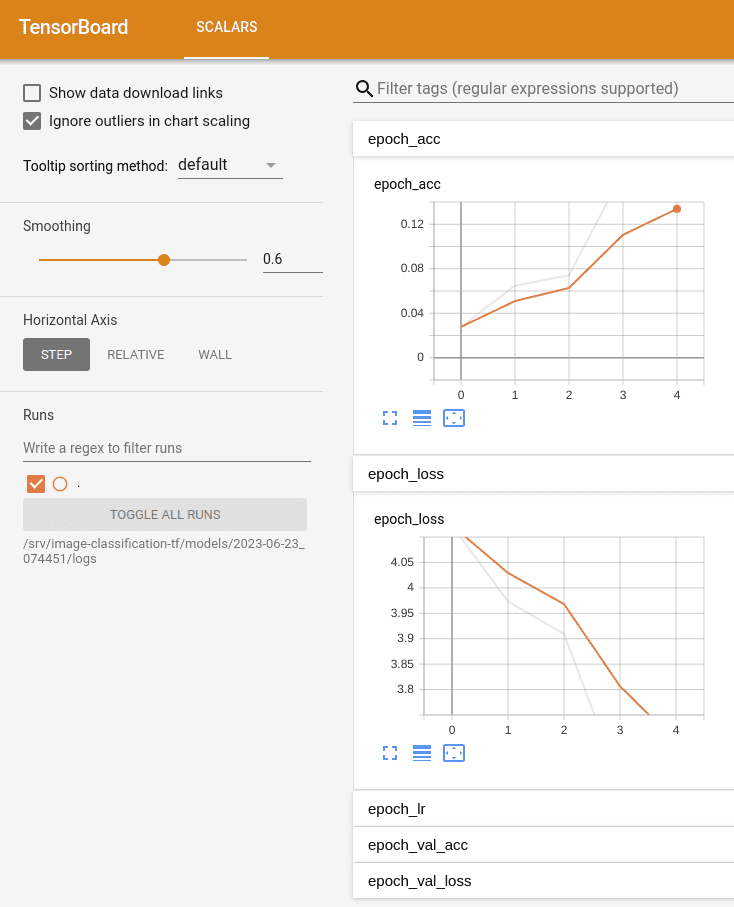
Additionally, if your model is integrated with MLflow you should be able to view your training stats in the MLflow UI.
You can kill everything using:
$ pid=$(pgrep -f deepaas-run) && child_pids=$(pgrep -P $pid) && kill -9 $pid $child_pids
5. Test and export the newly trained model
Once the training has finished, you can directly test it by clicking on the predict POST method. For this you have to kill the process running deepaas, and launch it again.
$ kill -9 $(ps aux | grep '[d]eepaas-run' | awk '{print $2}')
$ kill -9 $(ps aux | grep '[t]ensorboard' | awk '{print $2}')  # optionally also kill monitoring process
$ nohup deep-start --deepaas &  # relaunch
Note
We need to do this because the user inputs for deepaas are generated at the deepaas launching. Thus the original deepaas process is not aware of the newly trained model.
Once deepaas is restarted, head to the predict POST method, select you new model weights and upload the image your want to classify.
If you are satisfied with your model, then it’s time to save it into your remote storage. Open a Terminal window and run:
$ cd /srv/ai4os-image-classification-tf/models
$ tar cfJ <modelname.tar.xz> <foldername>  # create a tar file
$ cp <modelname.tar.xz> /storage/  # save to storage
Now you should be able to see your new models weights in Nextcloud. For Step 8, you will need to download the weights from the Dockerfile. To allow this, make the weights atr file publicly available. For this, click on ➜ Share Link ➜ (Create a new share link)
Zenodo preservation
Optionally, in order to improve the reproducibility of your code, we encourage you to share your training dataset on Zenodo. Once you upload the dataset, make sure to link it with the relevant Zenodo community (AI4EOSC, iMagine).
If long-term preservation and versioning of model weights is important to you, you can also upload the model weights to Zenodo in addition to Nextcloud.
6. Create a repo for your new module
Now, let’s say you want to share your new application with your colleagues. The process is much simpler that when developing a new module from scratch, as your code is the same as the original application, only your model weights are different.
To account for this simpler process, we have prepared a version of the the AI Modules Template specially tailored to this task:
Go to the Template creation webpage. You will need an authentication to access to this webpage.
Then select the
child-modulebranch of the template and answer the questions.Click on
Generateand you will be able to download a.zipfile with the project’s directory. Extract it locally.
7. Update your project’s metadata
The module’s metadata is located in the ai4-metadata.yml file (example).
This is the information that will be displayed in the Marketplace.
The fields you need to edit to comply with our schemata are:
title(mandatory): short title,summary(mandatory): one liner summary of your module,description(optional): extended description of your module, like a README,links(mostly optional): links to related info (training dataset, module citation. etc),tags(mandatory): relevant user-defined keywords (can be empty),categories,tasks,libraries,data-type(mandatory): one or several keywords, to be chosen from a closed list (can be empty).ㅤ 📋 Supported values
Libraries
Tasks
Categories
Data Type
TensorFlow
Computer Vision
AI4 pre trained
Image
PyTorch
Natural Language Processing
AI4 trainable
Text
Keras
Time Series
AI4 inference
Time Series
Scikit-learn
Recommender Systems
AI4 tools
Tabular
XGBoost
Anomaly Detection
Graph
LightGBM
Regression
Audio
CatBoost
Classification
Video
Other
Clustering
Other
Dimensionality Reduction
Generative Models
Graph Neural Networks
Optimization
Reinforcement Learning
Transfer Learning
Uncertainty Estimation
Other
inference(optional): this is is the minimum resources your module needs to run an inference correctly (eg. CPU cores, RAM, GPUs, etc). If not specified, the Dashboard will prefill with some defaults, that can later be adapted by the user during the configuration step.provenance(optional): this will allow your model to have a more rich provenance information, as your model provenance graph will show the resources and the hyper-parameters you used to train. The are two subfields you can specify:nomad_job: the Dashboard deployment UUID you used to train the final model,mlflow_run: the MLflow run UUID you used to train the final model,
Some fields are pre-filled via the AI Modules Template and usually do not need to be modified. Check you didn’t mess up the YAML definition by running our metadata validator:
pip install ai4-metadata
ai4-metadata validate ai4-metadata.yml
8. Update your project’s Dockerfile
Your ./Dockerfile is in charge of creating a docker image that integrates
your application, along with deepaas and any other dependency.
You will see that the base Docker image is the image of the original repo. Modify the appropriate lines to replace the original model weights with the new model weights. In our case, this could look something like this:
ENV SWIFT_CONTAINER https://share.cloud.ai4eosc.eu/index.php/s/r8y3WMK9jwEJ3Ei/download
ENV MODEL_TAR phytoplankton.tar.xz

RUN rm -rf ai4os-image-classification-tf/models/*
RUN curl --insecure -o ./image-classification-tf/models/${MODEL_TAR} \
    ${SWIFT_CONTAINER}/${MODEL_TAR}
RUN cd ai4os-image-classification-tf/models && \
    tar -xf ${MODEL_TAR} &&\
    rm ${MODEL_TAR}
Check your Dockerfile works correctly by building it locally and running it:
$ docker build --no-cache -t your_project .
$ docker run -ti -p 5000:5000 -p 6006:6006 -p 8888:8888 your_project
Your module should be visible in http://0.0.0.0:5000/ui
9. Integrating the module in the Marketplace
Once your repo is set, it’s time to integrate it in the Marketplace:
Open an issue in the AI ModuleCatalog repo.
An platform admin will create the Github repo for your module inside the ai4os-hub organization. You will be granted
writepermissions in that repo.ㅤ Naming conventions
Modules repos follow the following convention:
ai4os-hub/ai4-<project-name>: module officially developed by the projectai4os-hub/<project-name>: modules developed by external users
Upload your code to that repo.
An admin will review your code and add it to the AI Module Catalog. Once a module is approved it will take roughly 6 hours to appear in the Dashboard’s Marketplace.