Develop a model from scratch
Requirements
For Step 1, to use the Module’s template webpage, you need at least basic authentication.
For Step 2, if you plan to use the Development Environment, you need full authentication to be able to access the Dashboard. Otherwise you can develop locally.
For Step 4 we recommend having docker installed (though it’s not strictly mandatory).
This tutorial explains how to develop an AI module from scratch.
If you are new to Machine Learning, you might want to check some useful Machine Learning resources we compiled to help you getting started.
1. Setting the framework
This first step relies on the the AI Modules Template for creating a template for your new module:
Access and authenticate in the Template creation webpage.
Then select the
minimalbranch of the template and answer the questions.Click on
Generateand you will be able to download a.zipfile with with your project directory.
2. Prepare your development environment
Although it is possible to develop your code locally, we also offer the possibility to develop from our Development Environment.
This offers the benefits of:
developing on dedicated resources (including GPUs),
have direct access to your data hosted in the Storage,
develop on a Docker image that is already packaged with your favorite Deep Learning framework (eg. Pytorch, Tensorflow),
develop on your favorite IDE (Jupyterlab or VScode),
Check how to create and configure the Development Environment.
⚠️ Use storage-synced folder to develop
We strongly recommend to create a deployment attached to storage.
By doing so, you can develop your code inside the /storage folder and any changes you make will instantly be synced with the Storage.
This will prevent any work loss in case of an unexpected deployment crash (which do happen from time to time).
This is what an Development Environment with VScode would look out-of-the-box:
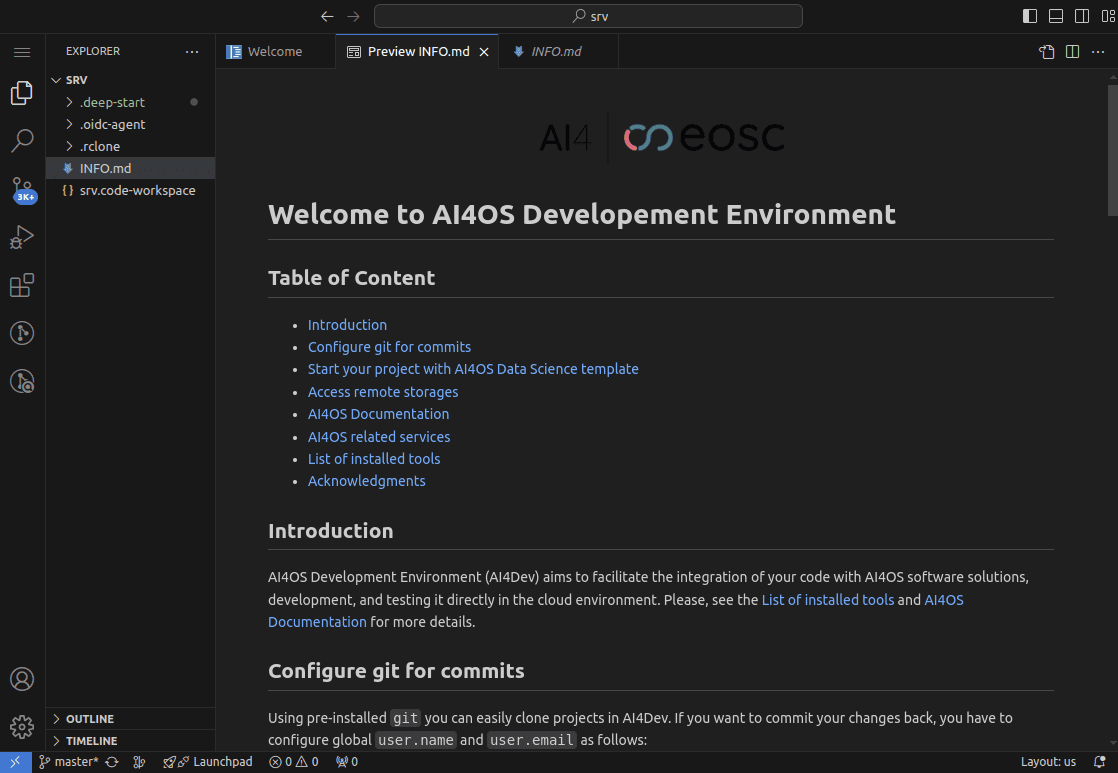
ㅤLaunching a development environment
Please, be aware that video demos can become quickly outdated. In case of doubt, always refer to the written documentation.
3. Editing the module’s code
Drag and drop in the VScode editor the zip file created in Step 1. Then unpack it.
ㅤ 💡 Optimal VScode setup: using LLMs and more
Tip nº1:
VScode by default is initialized in /srv.
For a better coding experience we suggest opening VScode with your folder project only.
This will allow you to ignore other non-related folders under /srv when doing global searches or tracking changes, for example.
For this, go to File > Open Folder > /srv/<project-name>.
As explained earlier, having your project under /storage will allow it to be automatically synced with the Storage.
Tip nº2: Use the platform LLM as coding assistant to help you develop faster. It is integrated directly in VScode trough the use of the Continue.dev extension.
We recommend implementing first tip nº1, in order to avoid the Continue assistant from freezing when trying to index the whole workspace contents.
Install your project as a Python module in editable mode, so that the changes you make to the codebase are picked by Python.
cd <project-name>
pip install -e .
ㅤ 🛠️ Troubleshooting pip installation
Some users have reported issues in some systems when installing deepaas (which is always present in the requirements.txt of your project).
Those issues have been resolved as following:
In Pytorch Docker images, making sure
gccis installed (apt install gcc)In other systems, sometimes
python3-devis needed (apt install python3-dev).
Now you can start adding your AI model code inside <project-name>/<project-name>.
Integrating with the DEEPaaS API
Once your code is included, you need your module to be able to interface with the DEEPaaS API, which allows any module in the Marketplace to be accessed using the same API.
For this, you have to define in api.py the functions you want to make accessible to the user.
For this tutorial we are going to head to our official demo module
and copy-paste its api.py file.
Once this is done, check that DEEPaaS is interfacing correctly by running:
deepaas-run --listen-ip 0.0.0.0
Your module should be visible in http://0.0.0.0:5000/ui .
If you don’t see your module, you probably messed the api.py file.
Try running it with python so you get a more detailed debug message.
python api.py
Remember to leave untouched the get_metadata() function that comes predefined with your module,
as all modules should have proper metadata.
In general, you will have the following ports available when making a deployment in the platform:
5000: default port used for exposing the API (eg. DEEPaaS)6006: default port used for exposing a monitoring endpoint (eg. Tensorboard)8888: default port used for exposing the IDE (eg. JupyterLab, VScode)80: port available to let developers expose their custom endpoint
Model Quality Assurance
In order to improve the readability of the code and the overall maintainability of your module, we enforce some quality standards in tox (including style, security, etc). Modules that fail to pass style tests won’t be able to build docker images. You can check locally if your module passes the tests:
tox -e .
There you should see a detailed report of the offending lines (if any). You can always turn off flake8 testing in some parts of the code if long lines are really needed.
ㅤ 🧠 Using code formatters
If your project has many offending lines, it’s recommended using a code formatter tool like Black. It also helps for having a consistent code style and minimizing git diffs. Black formatted code will always be compliant with flake8.
Once installed, you can check how Black would have reformatted your code:
black <code-folder> --diff
You can always turn off Black formatting if you want to keep some sections of your code untouched.
If you are happy with the changes, you can make them permanent using:
black <code-folder>
Remember to have a backup before reformatting, just in case!
4. Editing the module’s Dockerfile
Your ./Dockerfile is in charge of creating a docker image that integrates
your application, along with deepaas and any other dependency.
You can modify that file according to your needs.
If you need to add instructions based on the runtime (eg. perform certain actions depending on whether you detected a GPU), please use the ENTRYPOINT statement, as CMD will be overwritten by the platform when you deploying a given service (eg. JupyterLab).
We recommend checking the installation steps are fine. If your module needs additional Linux packages add them to the Dockerfile. Check your Dockerfile works correctly by building it locally (outside the Development Environment) and running it:
docker build --no-cache -t your_project .
docker run -ti -p 5000:5000 -p 6006:6006 -p 8888:8888 your_project
Your module should be visible in http://0.0.0.0:5000/ui .
You can make a POST request to the predict method to check everything is working as intended.
5. Update your project’s metadata
The module’s metadata is located in the ai4-metadata.yml file (example).
This is the information that will be displayed in the Marketplace.
The fields you need to edit to comply with our schemata are:
title(mandatory): short title,summary(mandatory): one liner summary of your module,description(optional): extended description of your module, like a README,links(mostly optional): links to related info (training dataset, module citation. etc),tags(mandatory): relevant user-defined keywords (can be empty),categories,tasks,libraries,data-type(mandatory): one or several keywords, to be chosen from a closed list (can be empty).ㅤ 📋 Supported values
Libraries
Tasks
Categories
Data Type
TensorFlow
Computer Vision
AI4 pre trained
Image
PyTorch
Natural Language Processing
AI4 trainable
Text
Keras
Time Series
AI4 inference
Time Series
Scikit-learn
Recommender Systems
AI4 tools
Tabular
XGBoost
Anomaly Detection
Graph
LightGBM
Regression
Audio
CatBoost
Classification
Video
Other
Clustering
Other
Dimensionality Reduction
Generative Models
Graph Neural Networks
Optimization
Reinforcement Learning
Transfer Learning
Uncertainty Estimation
Other
inference(optional): this is is the minimum resources your module needs to run an inference correctly (eg. CPU cores, RAM, GPUs, etc). If not specified, the Dashboard will prefill with some defaults, that can later be adapted by the user during the configuration step.provenance(optional): this will allow your model to have a more rich provenance information, as your model provenance graph will show the resources and the hyper-parameters you used to train. The are two subfields you can specify:nomad_job: the Dashboard deployment UUID you used to train the final model,mlflow_run: the MLflow run UUID you used to train the final model,
Some fields are pre-filled via the AI Modules Template and usually do not need to be modified. Check you didn’t mess up the YAML definition by running our metadata validator:
pip install ai4-metadata
ai4-metadata validate ai4-metadata.yml
6. Integrating the module in the Marketplace
Once your repo is set, it’s time to integrate it in the Marketplace:
Open an issue in the AI ModuleCatalog repo.
An platform admin will create the Github repo for your module inside the ai4os-hub organization. You will be granted
writepermissions in that repo.ㅤ Naming conventions
Modules repos follow the following convention:
ai4os-hub/ai4-<project-name>: module officially developed by the projectai4os-hub/<project-name>: modules developed by external users
Upload your code to that repo.
An admin will review your code and add it to the AI Module Catalog. Once a module is approved it will take roughly 6 hours to appear in the Dashboard’s Marketplace.
Next steps
If to go further, check our tutorials on how to: